High Level API
The ODIN Unity SDK provides prefabs and components that allow you to quickly embed voice-chat into your game or application with ease.
This manual handles the high-level API and the prefabs that are provided with the SDK. If you are looking for a more in-depth understanding of the low-level API, please refer to the Low Level API.
Getting started
Please read the manual to get started with the ODIN Unity SDK. It will guide you through the process of setting up the ODIN Unity SDK in your project.
Once you have the Unity SDK installed, you can start using the prefabs and components that are provided with the SDK.
The first prefab you need to add to your scene is the OdinInstance prefab that you find in the
Packages/io.fourplayers.odin/Runtime/ path.
OdinInstance prefab
Once you have added the prefab to your scene, it will look like this (it’s cut off at the bottom to save space):
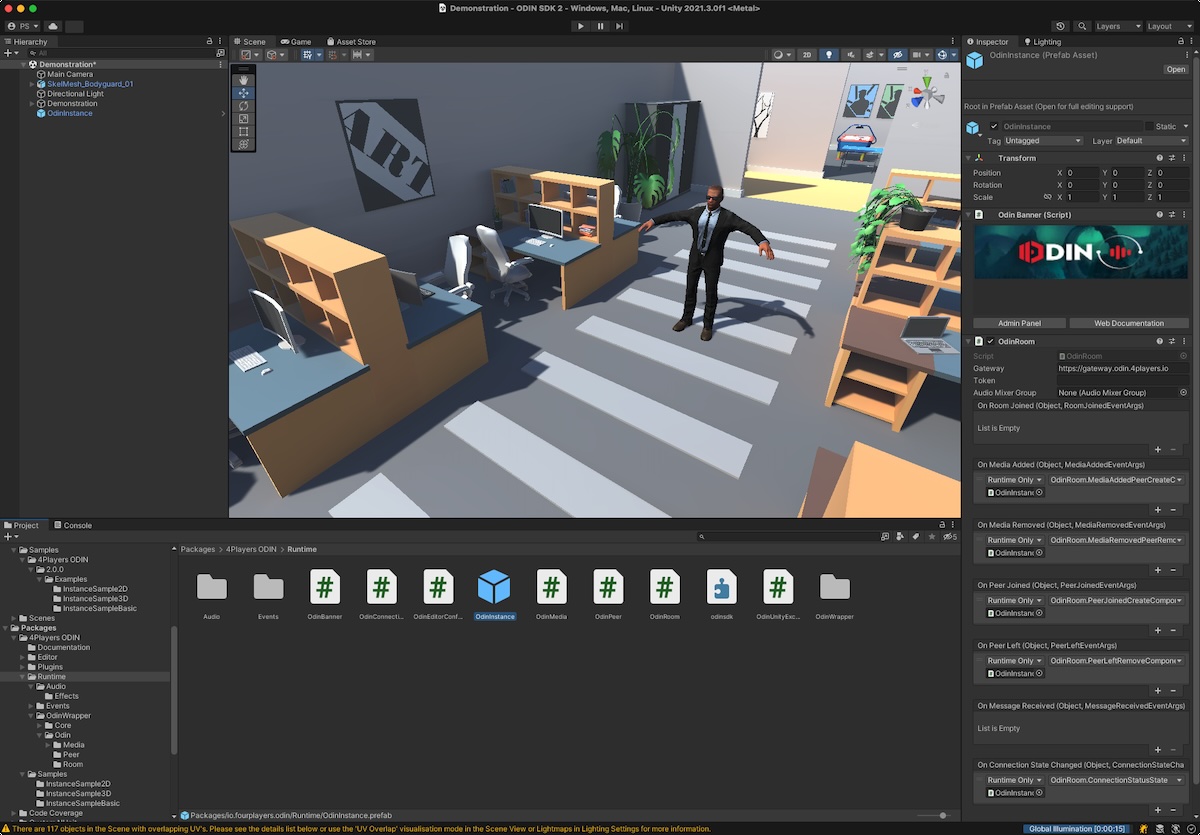
OdinInstance prefab in Unity Editor
It consists of the following components:
OdinBanner: It’s just for eye candy and useful links to our developer documentation and the admin panel.- OdinRoom : This is the main component that handles all the communication with the ODIN servers and provides easy to use delegates and events that allow you to customize the experience very easily to your own needs.
OdinRoom component
The OdinRoom component is the main entry point for the ODIN Unity SDK.
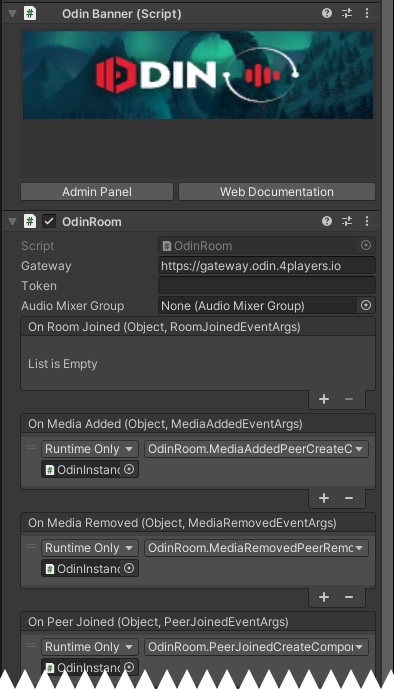
OdinRoom component in Unity Editor
Properties
The component already handles these events for you per default to implement basic 2D non-spatial voice-chat:
- OdinRoom.OnPeerJoined
- OdinRoom.OnPeerLeft
- OdinRoom.OnMediaAdded
- OdinRoom.OnMediaRemoved
- OdinRoom.OnConnectionStateChanged
Depending on what you want to do with the audio sources you can subscribe to one of these events in addition to the default handler or you might need to drop the default handler and implement your own.
OdinMicrophoneReader
The OdinMicrophoneReader component is responsible for capturing the audio from the microphone and sending it to the ODIN servers.
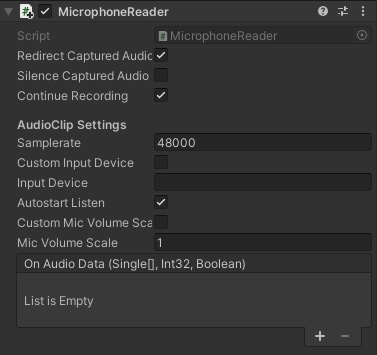
OdinMicrophoneReader component in Unity Editor
Properties
| Property | Description |
|---|---|
| Redirect Captured Audio | If enabled (default) automatically sends captured audio to ODIN servers. Disabling requires special handling and should only be done in rare situations |
| Silence Captured Audio | Mute audio so that no audio is sent to ODIN servers. This is disabled by default. |
| Continue Recording | Once the available audio buffer is full OdinMicrophoneReader automatically wraps to start and overwrites previous audio. Should only be disabled in rare use cases |
| Custom Input Device | OdinMicrophoneReader uses the input device selected in the operation system settings. Enabling this option will allow you to set a specific Input Device |
| Input Device | Set the name of an input device that should be used instead of the default input device set in the operating system. You need to enable Custom Input Device to make use of this setting |
| Autostart Listen | Automatically start listening on the microphone (will activate the microphone in Start) |
| Custom Mic Volume Scale | Disabled by default, enable to set the volume scale in Mic Volume Scale setting |
| Mic Volume Scale | Set a microphone volume scale factor (requires Custom Mic Volume Scale to be enabled) |
| OnAudioData | A Unity event that you can subscribe to in one of your components to handle the MicrophoneReader.OnAudioData event, which is called whenever new audio data is available. |
Joining a room
Once you have added the prefab and configured your events, not much happens yet. You need to join a room to start with the voice chat.
Every user connected to the same room can hear and talk to each other user joined in the same room. The room is identified with a basic string identifier. You can join as many rooms as you want, but you can only talk to users in the same room.
To join a room, you just need to set the
OdinRoom.Token
property.
OdinRoom
will
check each Update cycle if the token has been set and if it has been set, it will join the room.
Tokens are typically generated by your backend and are used to authenticate the user and to provide the user with the necessary information to join the room. You should never generate tokens in your frontend or client application as this would expose your secret keys to the public. See Access Keys in ODIN for more information on that topic. We have an example on how to generate tokens using a simple NodeJS script in a cloud function: Generating Tokens.
Creating a token for testing purposes
If you want to test ODIN without setting up your own backend, you can use this code to create a token for testing purposes. Please note: The function ( OdinRoom.GenerateTestToken ) is only available in the Unity Editor and should not be used in a production environment.
  var accessKey = "__YOUR_ACCESS_KEY__";
  var roomName = "MyRoom";
  var username = "Username";
  _Room.Token = OdinRoom.GenerateTestToken(roomName, username, 5, AccessKey);
You can create an access key for testing purposes for up to 25 users directly in this web component:
Testing the setup
Just press Play in the Unity Editor to test your basic ODIN integration. The operating system will ask you for permission to use the microphone. You need to build the client and deploy it to a colleague or another machine to test the voice chat integration.
You can also use our free Web Client to test your setup. You’ll just open our Web Client in your browser, set the same access key and room name and you can talk to your Unity client. You can find a guide on how to use the Web Client here.
You should now have simple one-room non-spatial voice chat working. Anyone in the same room can hear and talk to each other. During play and when others are connecting to the same room, you’ll see new GameObjects being created in the hierarchy for peers (they have an OdinPeer component attached to them) and for each peer you’ll see GameObjects with an OdinMedia component being attached.
Implementing 3D spatial voice-chat
Implementing a 3D spatial voice-chat requires a bit more work. It’s basically the same as the 2D non-spatial voice-chat, but, these two things need to be done:
- First, the spatialBlend
of the AudioSource needs to be set to
1.0which is 3D sound. This enables Unity to calculate the volume and direction of the sound based on the position of the GameObject in the scene. - Second, the OdinPeer component (and thus subsequent OdinMedia objects) needs to be attached to a GameObject that is moving in the scene. This is typically the GameObject that represents the player or the avatar of the player.
The actual implementation is different for each game or application and depends on how you have set up your multiplayer framework. Typical multiplayer frameworks like Mirror Networking, Unity Netcode for GameObjects or Photon PUN assign connectionIds to players. You can use these connectionIds to identify the player and attach the OdinPeer component to the GameObject that represents the player.
Odin has their own ids for peers and media, so to some extend you need to map ODINs user ids to (connection) ids in your game. When connecting to a room in ODIN, you can set a user data object that will be sent to all other peers in the room. This user data object can contain the connection id of the player in your game. You can then use this connection id to map the Odin user id to the player in your game.
That’s all there is to do to change 2d non-spatial voice-chat to 3D spatial voice-chat.
We have a guide on how to implement 3D spatial voice-chat using the Mirror Networking framework with the 1.x version of the Unity SDK, but the principles are the same and can be applied to any multiplayer framework. You can find the guide here: Unity Mirror Integration.
Mixing 2D and 3D voice-chat
In some games or applications, you might want to mix 2D non-spatial voice-chat with 3D spatial voice-chat. As use-case for this is that you have 3D spatial voice-chat for players in a “world” room where every player can hear and talk to each other based on their position in the world, but you could also have a radio room for seperate teams that have 2D non-spatial voice-chat.
Imagine CounterStrike where you have 3D spatial voice-chat for the players in the world, but you also have 2D non-spatial voice-chat for the players in the same team. If a player is talking via radio, only the players in the same team he still can be heared by the enemy in 3D spatial voice-chat. So, it might be a good strategy to quickly sneak up to the enemy and listen to what they try to privately discuss in their radio.
To do that, you create two OdinRoom GameObjects in your scene but with different room names. Depending on the room you would have different event handlers to handle 2D voice chat or 3D voice chat.
Next steps
You should now have a basic understanding of how to use the high-level API of the ODIN Unity SDK. You can now start implementing your own voice chat solution in your game or application. Check out the scripting API for more information on the actual functionality.